Installing and Using Python on Windows
Our recommended way of installing Python on a Windows operating system is using the full installer from the official python.org Downloads page (from the big yellow button) using the default options, except making sure to check the "Add python.exe to PATH" checkbox. Getting Python from the Microsoft Store is not recommended as it can cause various issues.
This guide gives detailed instructions on that recommended way to install Python on Windows, then goes on to discuss more information about installing Python on Windows, and finally wraps up by explaining some common Windows-specific Python usage, namely the py launcher, and how to work with virtual environments.
You may also want to check out our guides on Common Issues Using Python on Windows, Adding Python to the Windows Path, and Setting up a Unix-Style Environment on Windows.
Recommended Install
Follow the five steps below to install the latest version of Python on Windows.
(The instructions were written with Windows 10 and Python 3.11.0 in mind, but should be nearly or fully identical with Windows 11 or other modern versions of Python.)
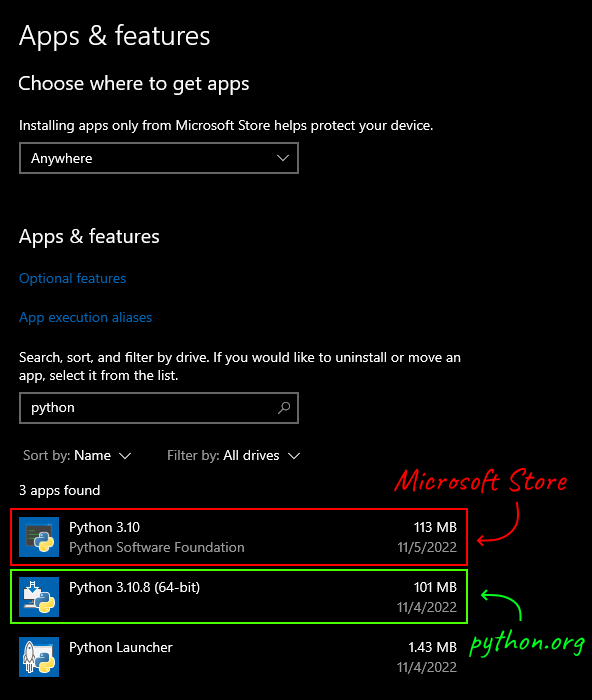
If you want a fresh start, you should check for and uninstall any versions of Python already on your PC, including those from the Microsoft Store. This can be done in the "Apps & features" Windows settings (type "apps and features" into the Start Menu to find it). Though it's fine to have multiple versions of Python installed at once. It can be useful for testing version compatibility or for working on projects made in a certain version. Only uninstall things if you want to.
-
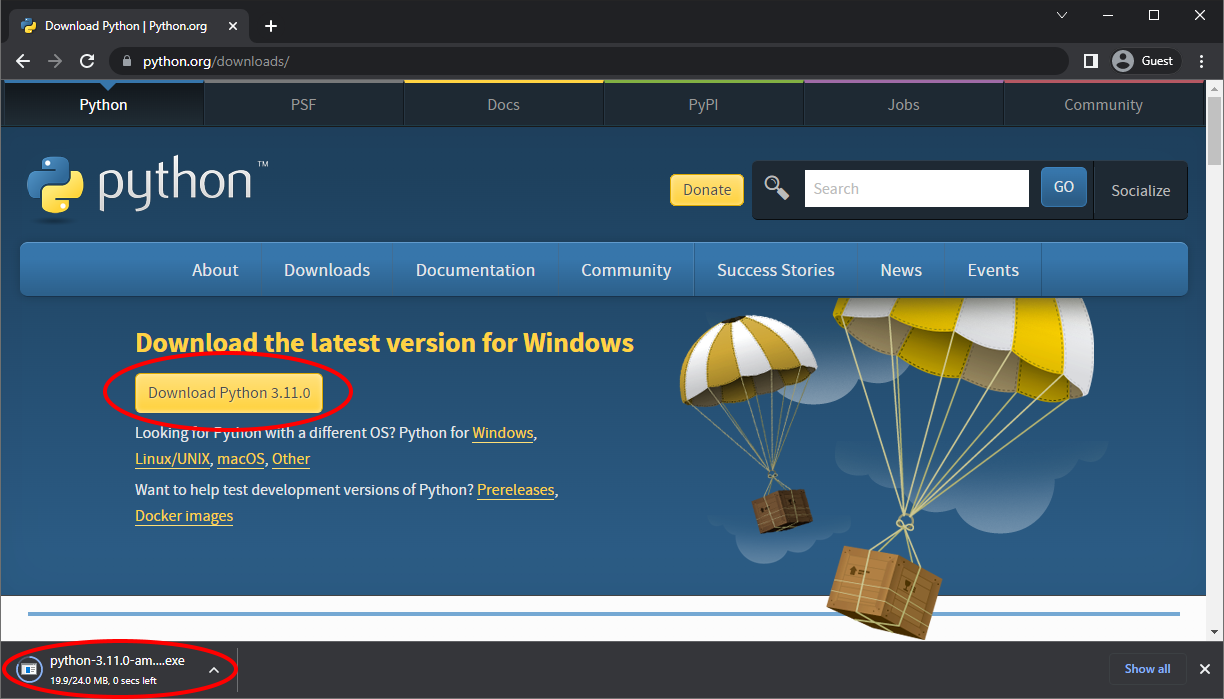
Go to python.org/downloads and click the big yellow "Download Python 3.x.x" button near the top of the page. That should start the download of the installer (a file like
python-3.11.0-amd64.exe) for the latest version of Python.If you want a different version or it doesn't work for some reason, you can download the Windows installer you want from python.org/downloads/windows. If you still have a 32-bit operating system you'll need to go here and look for the latest "Windows installer (32-bit)" because the yellow button downloads the 64-bit installer by default.
-
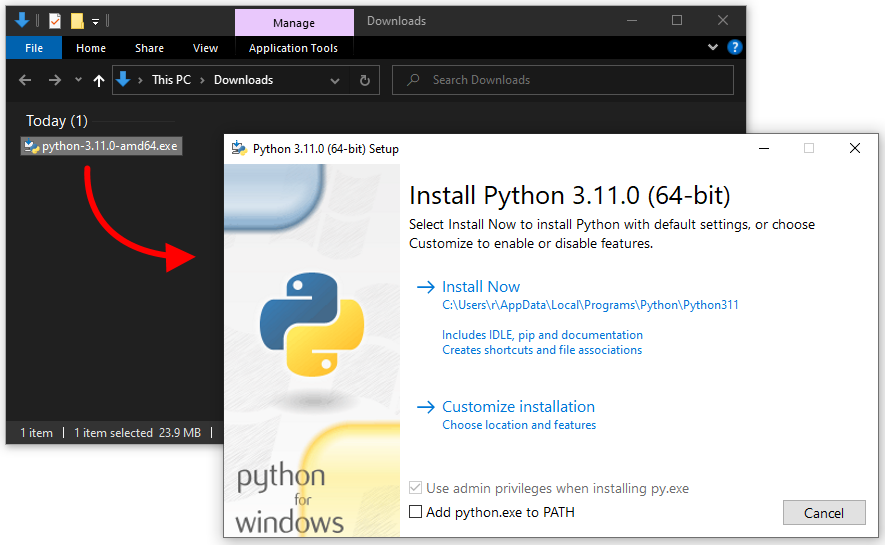
When it finishes downloading, click the file in your browser or find it in your Downloads folder and double-click it to start the installer.
-
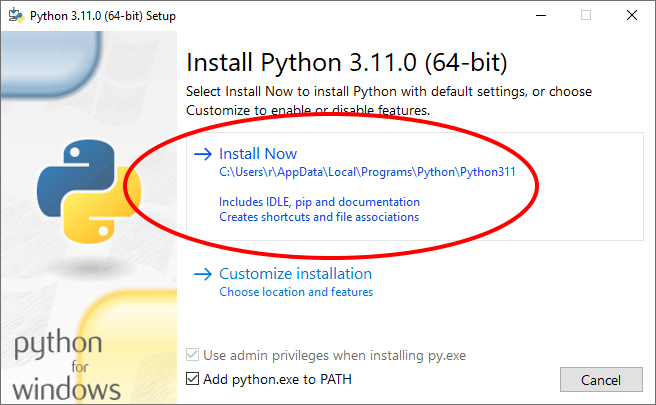
Check the "Add python.exe to PATH" checkbox (the text may differ slightly depending on your installer). This will make it so terminals can recognize commands like
pythonandpip. (Read this guide to learn more.)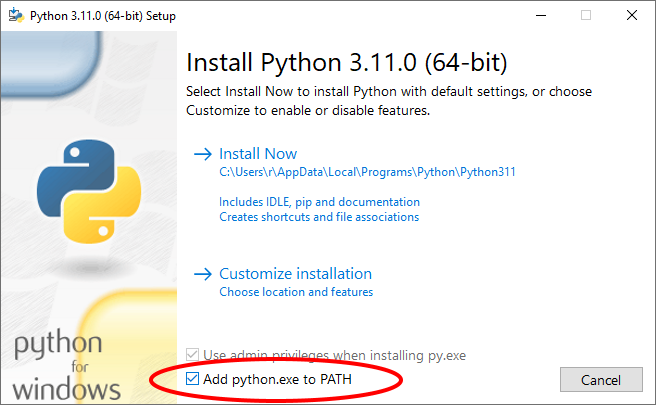
-
Then click the big "Install Now" button. Aside from adding Python to PATH, the rest of the installer defaults are usually fine, so there's no need to customize the installation unless you have a specific reason to.
-
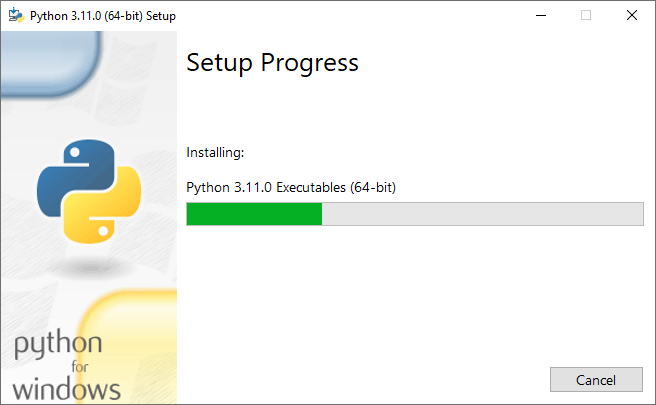
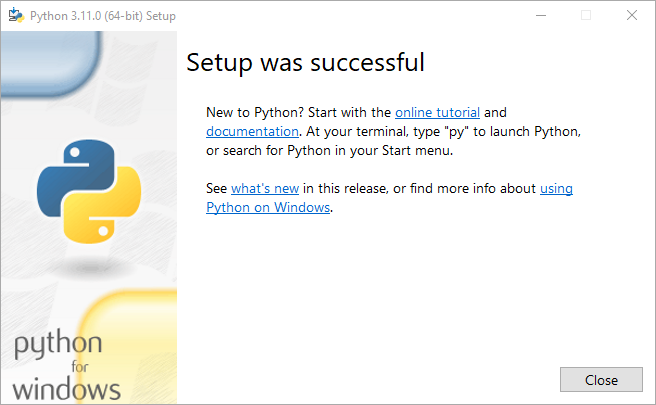
It will take a minute to install and then (hopefully) say "Setup was successful".
Congrats! You just installed Python! You can close the installer.
Checking that it Worked
To test that installing Python worked, you can do what it suggests and search "python" on the Start Menu to find the
Python console app and run some code like print("Hello, World!").

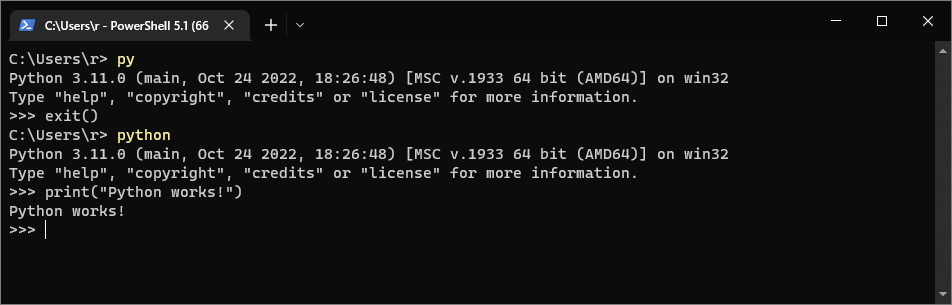
Or try the more usual way of running Python by typing python in a new terminal window to open up the Python
REPL, or use python somefile.py to run a
Python file. You can use whichever terminal you prefer: Command Prompt, PowerShell, an IDE-integrated terminal, Windows
Terminal, etc. It just has to be a freshly
opened terminal or the commands may not be recognized.
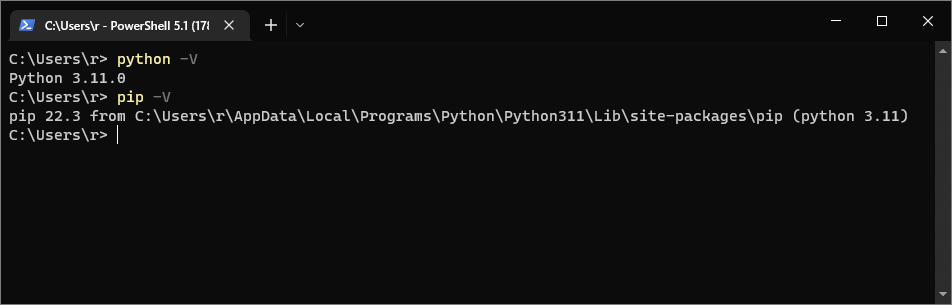
You can double check what versions of Python and pip were installed by running
python -V or pip -V in a terminal:
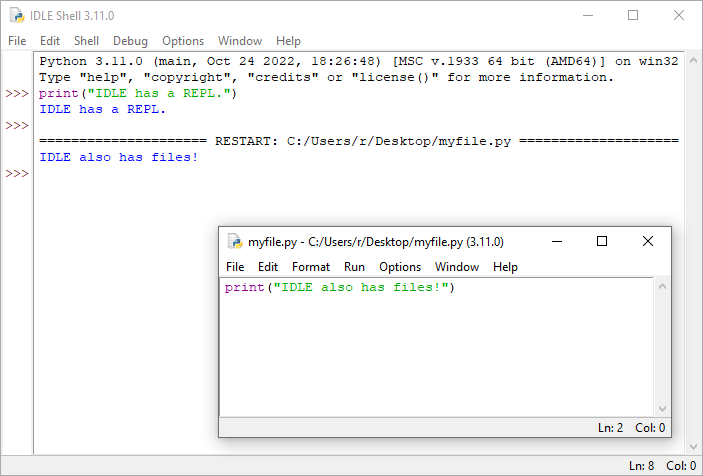
And finally, it's worth searching and opening "IDLE" on the Start Menu, which is the the basic IDE that comes with Python. Most people end up using PyCharm or VSCode to program in Python but IDLE is a great starting point.
More Installation Information
Selecting an Installer
At python.org/downloads/windows there are many different Windows Python installer options available. A link to the latest release page is listed at the top, for example the Python 3.11.0 release page has info about the new 3.11 features, with downloads at the bottom. Back on the list of all Windows releases, pre-releases are on the right if you want to try cutting-edge (and possibly unstable) versions of Python, and stables releases are on the left, all the way back to Python 2.0.1 from 2001. Some minor release versions may not have installers available.
You should usually select the "Windows installer" option instead of the "Windows embeddable package" when picking what to get. Check out the official documentation for more details on installing and using Python on Windows.
Which Version?
Current Python versions follow the form 3.minor.micro (similar to
semantic versioning), for example
3.11.0. "3" is the major number and not about to change. Minor
releases happen yearly and provide new features and breaking changes, whilst micro
releases are more common and only include bug/security fixes. When people say "Python 3" they they aren't necessarily
specifying a minor or micro version, but you can often assume they mean the latest ones.
Installing the latest minor version will give you access to Python's newest features. However, some packages may not support the newest versions straight away, so installing the second latest (for example, installing 3.10 when 3.11 is the latest) will help you avoid those issues. If you find you want some newer features or your module does not support your current version, you can always install another version as well.
You should generally always install the newest micro version, although some may not provide an installer, in which case you should find the newest one that does.
What about Python 2 and 4?
Python 2 should not be used unless you are absolutely required to for legacy code or school.
It was officially sunset January 1, 2020:
As of January 1st, 2020 no new bug reports, fixes, or changes will be made to Python 2, and Python 2 is no longer supported.
Python 2 code is not that different from Python 3 code, notable differences being that print was a statement rather
than a function so it didn't need parentheses, and input evaluated the things inputted (unsafe!). Still, it's best
to try to not use learning resources written in Python 2, and definitely don't start new projects in Python 2.
Python 4 is not happening anytime soon, if ever.
32-bit vs 64-bit?
Install 64-bit Python unless you have reason not to, such as having an old 32-bit computer. Modern PCs (and all Windows 11 PCs) are 64-bit. With 32-bit you may run into memory limits if doing intensive operations (Python will be limited to using 4GB of memory), and some installed modules may not offer prebuilt wheels for 32-bit, potentially making installs slower or meaning you have to install build dependencies.
If you get an error when installing 64-bit Python, your computer may not support it. To find out if this is the case, search "About your PC" in the Start Menu and open the settings page. Then look for the "System Type" option under "Device Specifications". It should say "64-bit operating system, x64-based processor" if you have support. You need a 64-bit processor and operating system to install 64-bit programs.
The py Launcher
By default, when you install Python on Windows from a python.org installer,
it comes with the "py launcher". The py launcher is a command line tool you invoke using the py command and it helps
you run a specific version of Python when you have multiple versions installed.
The py command is not mere shorthand for the python command. They are separate programs as can be seen in the
"Apps & features" Windows settings. Though running either of them with no arguments will start the Python
REPL.
The py launcher provides the py -0 command (or py --list) which lists the Python versions you have installed.
py -0p does the same but includes the paths to the Python executables.
For example, on my PC I have Python 3.11 and 3.10 installed, and the py launcher shows it:
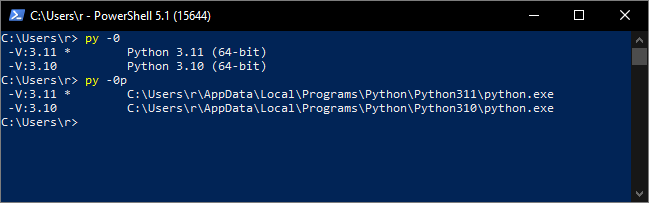
The versions are ordered from newest to oldest, and the asterisk (*) indicates which version currently running py
will call by default (3.11 in my case). Exactly which version that is depends on the following requirements, and may not
be the same version you get when running python (if you get any).
If an exact version is not given to
py, the latest is used unless overridden by the following, (in priority order):
- An active virtual environment.
- A shebang line in the script (if present).
- With a
-2or-3flag and matching PY_PYTHON2 or PY_PYTHON3 environment variable.- A PY_PYTHON environment variable.
- From
[defaults]in py.ini in your%LOCALAPPDATA%folder.- From
[defaults]in py.ini beside py.exe (usually inC:\Windows, usewhere.exe pyto locate).
You can give the py launcher an exact version of Python to run (assuming you have it installed) by specifying the major
and minor versions. For example, to invoke Python 3.7, you could run py -3.7. You can then pass any arguments on top
of that, for example py -3.7 myscript.py to run myscript.py, or py -3.7 -m pip install numpy to invoke pip to
install NumPy into Python 3.7.
If you want can always use py instead of python and not have any Python versions on the Windows Path at all (check
out this guide to learn about the Windows Path). Though, once in a while third party
software may want to invoke python, so keeping it on the Path is handy. We recommend having your "main" Python version
on the Path so you can invoke it with python, and then using py -X.Y whenever you want a different version, e.g.
py -3.7.
The official documentation of the py launcher can be found
here. Use py --help to show help on the
command line.
The py launcher is not available on GNU/Linux-based platforms such as macOS, but there is an unofficial version by Brett Cannon.
Virtual Environments
Virtual environments ("venvs") are a way of giving each of your Python projects their own space to install dependencies in, so different projects can have different versions of the same dependencies. For example, suppose you are working on two websites that both use the Python web-framework Django. One site is older and requires Django 3.2, and the other is newer and requires Django 4.1. If you install Django globally, no matter if you install 3.2 or 4.1, one or the or the other of the projects will have the wrong version. If instead you make a virtual environment for each project, you can install the required Django version for each separately.
Virtual environments are not exclusive to Windows, but the commands to use them can differ across operating
systems. Check out the official docs and
the builtin venv module for more details, but there are basically 3
important venv commands. Run them once you cd into your project folder.
- Create a virtual environment:
python -m venv .venv - Activate a virtual environment:
.venv\Scripts\activate - Deactivate a virtual environment:
deactivate
(".venv" is a common name for the folder to put virtual environment files in but other names are allowed too.)
Once you activate a virtual environment, anything you pip install will be installed only to that environment. You
should be able to tell when a venv is active because (.venv) or similar will appear at the start of terminal
prompts.
If your editor/IDE has handling for virtual environments, it's worth looking into how it works. Here's a VSCode tutorial and here's one for Pycharm.
The venv module used above comes with Python, but Poetry,
Pipenv, and Virtualenv are other popular
tools for managing dependencies and virtual environments. Answers to this Stack Overflow
question explain all the confusingly similar names and much more.